Rackmonkey Features
If you manage one rack or hundreds you know how important it is to keep track of your systems. Too often people put up with cumbersome 'Enterprise' management tools or an unmanageable collection of text files and spreadsheets. Rackmonkey is designed to make recording and managing your hardware and system information straightforward.
Need to find your tape library? Know the serial numbers of all your web servers? The age of your key customer's switches? Which systems run Windows 2003? Where to put your new database server? When the warranty on your Dell servers expires? Rackmonkey can help you answer all these questions.
Being able to visualise your racks is key to getting things done in the data centre. Rackmonkey draws high-quality rack diagrams that you can use on your computer or print out for use anywhere.
The rest of this document illustrates some of Rackmonkey's key features and how you can use them.
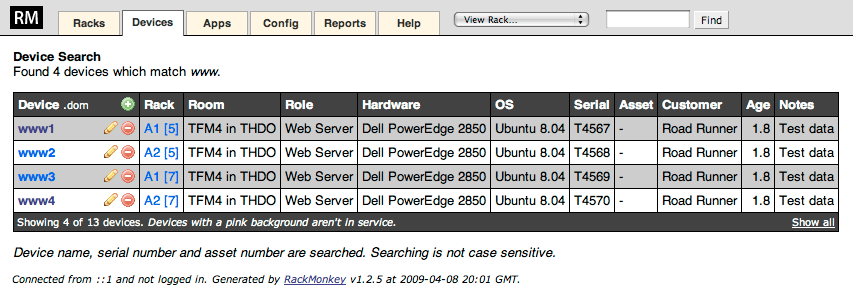
Finding a Device
If you want to locate a device, simply type its name, serial or asset number into the find box at the top right of every Rackmonkey screen. In the screenshot below we've searched for 'www' and found 4 devices. To view a device in its rack just click on the rack name next to the entry you're interested in.
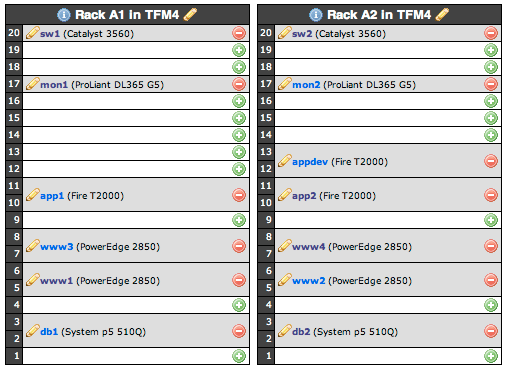
Viewing Racks
Rackmonkey allows you to view individual racks or many racks side-by-side. To jump to the physical view of a rack select it from the dropdown at the top right of Rackmonkey views. To see multiple racks select the Racks tab.
The screenshot below shows two racks side-by-side. You can add, remove, edit or see detailed information on a device with a single click. Click the (i) icon at the top of a rack to display expanded information including serial and asset numbers.
Rackmonkey automatically produces high-quality printouts using a dedicated stylesheet: simply choose Print from your browser in the normal way. Even when you don't have network access you can refer to the information you need.
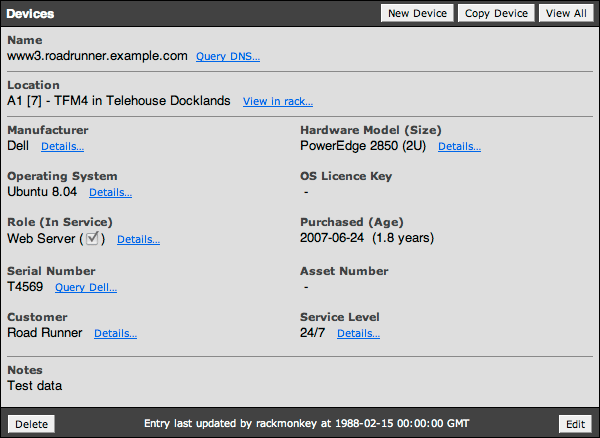
Device Detail
If we want more detail on a particular device we can click on its name from the device table or a rack layout. Key information is presented with links to details of hardware, operating system, customer and service level.
The notes field includes support for formatting and URLs, so you can link through to other information, such as a wiki or status page. If the device is a Dell and you have entered its serial number (service tag), Rackmonkey will link through to the Dell site so you can see detailed warranty and specification information (warranty information for other manufacturers will be available in future releases). Note how Rackmonkey has recorded when the last update was made and by whom - in this a sample device created by the 'rackmonkey' user. You can create accounts for each user so you know who edited what and when.
Working with Devices
Sometimes you need to work with a group of devices. For example you may be asked to provide a list of all the HP DL365s in use by a given customer. The device table view allows you to filter and sort devices so you can get to the information you need. You can also select different variants of the device table view with the dropdown at the top left of the screen, for example to display asset information or unracked devices.
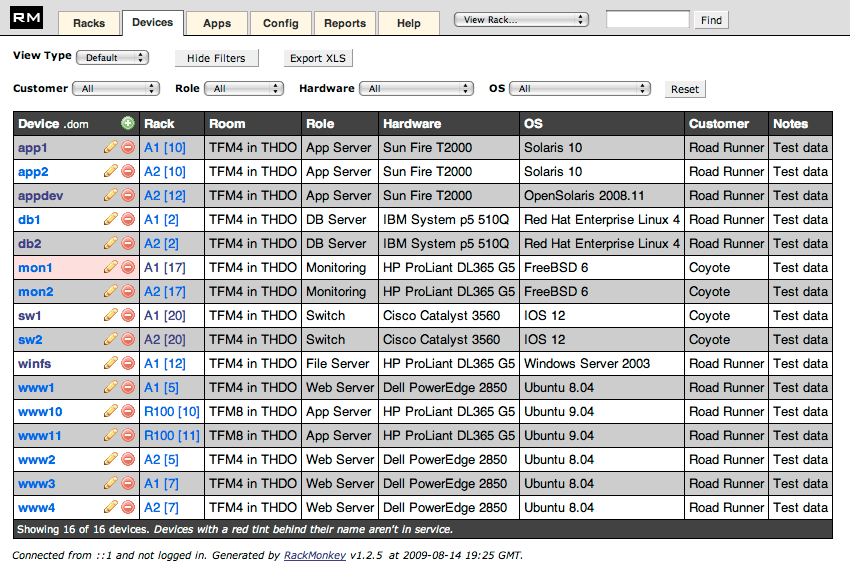
The device table also allows you to export full information on your devices to Excel spreadsheet format. Provide a copy of specific hardware information to non-technical departments or third parties.
More Features
Rackmonkey has numerous other features including:
- Associate applications with your devices
- Record OS licence information
- Find duplicate serial, asset or licences numbers
- Report on largest customers, most common hardware etc.
- Copy devices and racks for faster data entry
- Link through to hardware support information so it's always to hand
- Provide read-only access to Rackmonkey data
Install it Yourself
Rackmonkey is easy to install, so why not download it and test it yourself. Rackmonkey works on pretty much any Unix or Unix-like system and can store its data in SQLite, Postgres or MySQL to suit your needs.
More information, including detailed system requirements, can be found in the documentation and the FAQ.