RackMonkey 1.2.5 User Guide
RackMonkey 1.2.5 Documentation Index
RackMonkey Version 1.2.5
©2004-2009 Will Green (wgreen at users.sourceforge.net)
Licensed under the GNU Public Licence v2.
This guide will help you get started with RackMonkey and demonstrate some of its key features. This page includes screenshots: letters in brackets, such as (E), are used to refer to different screenshot areas from within the text.
Contents
Tip: Hovering your mouse over many items interface items (such as buttons) provides additional information.
1. Interface Basics
1.1. Navigation
The top of every RackMonkey screen looks similar to the screenshot below. There is a set of tabs (A) that provide access to the key parts of the application, a dropdown to jump to a physical view of a rack (B) and a search box (C) which allows you to find devices by name, serial or asset number. The search is not case-sensitive and will also find partial matches. For example, searching for 'www' will find devices called 'WWW', 'www21' and 'www22'.
1.2. RackMonkey Organisation
In order to use RackMonkey effectively you should be clear on what the different types of objects represent. The core objects are racks, devices and apps and they have their own interface tabs. Other objects can be found under the Config tab.
- Servers, routers, switches etc. are devices and are contained within racks.
- A device has a hardware model and an operating system.
- A device optionally has a domain (such as rackmonkey.org), a role (such as database server), a customer and a service level.
- Apps run on devices.
- Racks are organised in rows which reside in rooms within buildings.
NB. Organisation by row is not supported within the user-interface in this release of RackMonkey. It will be added in a later release.
1.3. Rack Units
The sizes and positions of devices within RackMonkey are defined in rack units 'U'. This release of RackMonkey only supports integer U and will round non-integer values. For example, if you try to set the size of a switch to 1.5U it will be changed to 2U. A later release of RackMonkey will lift this restriction and allow 1.5U and other non-integer devices.
1.4. Printing
RackMonkey 1.2.5 includes dedicated print CSS to produce high-quality print outs. Print as normal in your browser and the optimised CSS should be chosen automatically. For example, you might use this to take a rack diagram into the data centre. For device tables we recommend using landscape mode, as the content is quite wide. Even these help pages are optimised for printing (tested with A4 and US Letter paper).
2. Config
The Config tab contains most of the basic building blocks of RackMonkey data. Here you can configure Buildings, Rooms, Domains, Hardware models, Operating Systems, Organisations (such as customers and manufacturers), Roles and Service Levels. It's a good idea to add your own commonly used items to these categories when you start using RackMonkey. If the sample data was installed with RackMonkey you will have a selection of operating systems and hardware to get you started (see the install documentation for information on sample data).

The link at the bottom of config view View RackMonkey System & Database Information can be used to get information on the software you're using. If you're reporting a bug please include this information.
3. Working with Devices
3.1. Deciding How to View Devices
The Devices tab (screenshot below) allows you to see all the devices and their configuration. There are several devices views which present different information; you can select an alternate view from the View Type dropdown (A). For example, if you are interested in asset information (such as serial number and age of device), choose the Asset view. To sort the table by a particular column click on its name; for example you could sort devices by Customer rather than the default name (chosen by clicking on the Device column). You can show/hide domain information for devices by clicking the .dom link (D).
The Show Filters button (B) brings up the filter options that allow you to narrow down the devices shown to those of interest; for example you can show all devices for a given customer or all those running Ubuntu. To return to a view of all devices, click the Reset button at the right of the filters or select the Show All link (not pictured) in the table footer (G). Devices that aren't in service are shown with a red tint (as is the case with the mon1 device in the screenshot).
If you have enabled the Excel export plugin (see installation instructions for details) then you can export the complete device table by selecting the Export XLS button (C). The XLS export always includes all data irrespective of the view type or filters chosen . The format of the exported spreadsheet is Excel 97-2004 and is viewable in a wide range of applications, including Microsoft Excel, OpenOffice Calc and iWork Numbers.
3.2. Working with Individual Devices
To view the full details for an individual device, select its name. This brings up a separate screen which also allows you to edit, copy or delete the device. You can also edit a device directly by selecting the pencil icon next to its name or delete it by clicking on the minus icon (F). To view a device within its rack, select the link in the rack column (E). You can add a new device by clicking on the plus icon (D). If you're adding many items to the same rack you may find it easier to do this Racks Physical View (discussed below).
The footer at the bottom the page (H) includes information on the connected user/IP, RackMonkey version and time the page was generated. This helps you ensure you're looking at current information and is also included in print outs.

When you click on a device name you are taken to the single device view (screenshot, below).

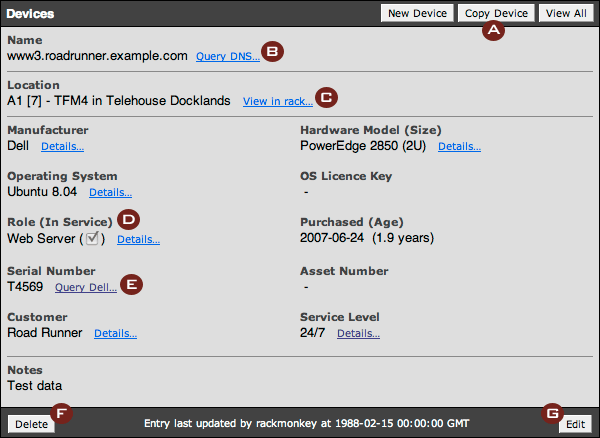
The buttons at the top right of the form (A) allow you to create a new device from scratch, copy the key details of the current device and to return to the view of all devices (see above). If you have enabled the DNS plugin (see installation instructions) you can query the DNS information for the device (B). To view the device highlighted in its rack, click on View in rack… link (C) (the physical rack view is covered in detail below).
Along with the role of the device (D) is an indicator of whether it is in service, for example a server might be racked, but not yet be running any applications. The serial (E) and asset number fields are searched when using the find feature at the top right of each RackMonkey view (see above). If the serial number is from a manufacturer with online warranty information RackMonkey will provide a link to query that information. In RackMonkey 1.2.5 this is only supported for Dell, but support for other manufacturers will be added in later releases.
Not shown in this example is the App section. If a device is associated with Apps then they will appear above the notes section. Details on the App view are included below. The footer at the bottom of the form allows the deletion (F) and editing (G) of the entry, as well as showing who last updated it and when. Any attempt to delete an entry will require confirmation.
3.3 Devices & Domains
When editing devices, RackMonkey allows you to assign a domain to each device from a dropdown. If you have many devices on the same domains this makes things easier and cleaner. For situations where many devices are on separate domains (such as colocation) you may prefer to put the complete name (including the domain) in the 'name' field and set the domain drop down to 'not applicable'. RackMonkey is smart enough to use the name correctly in this form and the DNS plugin will work as expected. You can of course mix both approaches.
4. Working with Racks
4.1. Racks Table
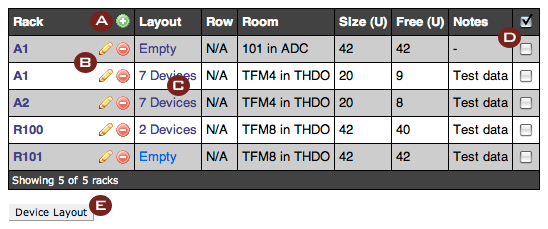
The Racks view (screenshot below) gives you an overview of your racks: which room they reside in and the number of devices they contain. To view the details of a particular rack select its name (B). To view the layout of devices within a rack select the relevant entry in the layout column (C) (see Racks Physical View, below, for details). If you want to see multiple racks side-by-side, select the check boxes next to the racks you wish to view (D) (selecting the check mark in the top column toggles the selected racks) and click the Device Layout button (E). You can sort the racks table by clicking on the headings at the top of the table. For example selecting Free U will sort the racks from least to most free space.
You can see the number of devices within a rack in the Layout column (C). The total and used space in rack units are shown in the Size (U) and Free (U) columns. To create a new rack use the plus icon (A), to edit a rack click the pencil icon next to its name, to delete it click on the minus icon (B).

4.2. Racks Physical View
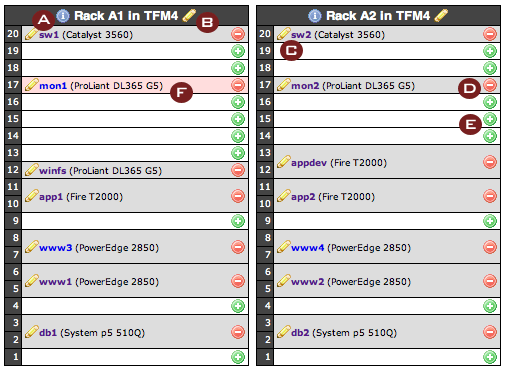
In the Physical Rack View (screenshot below) you can see the contents of your racks. You can jump to physical view at any time using the dropdown at the top of every view (see interface basics). This view shows the name and hardware type of each device. To view more details about devices in the rack, such as the manufacturer and serial number, click on the 'i' icon at the top left (A). To edit the rack itself click on the pencil at the top right of the rack (B).
To edit or delete a device, click on the pencil (C) or minus buttons (D) next to the device. To add devices to the rack, click on the plus icon in the location you wish to place the device (E). Devices that aren't in service are shown within the rack with a red tint (F).
In order to view more than one rack side-by-side you need to select them in the Racks Table (see above).

5. Working with Apps
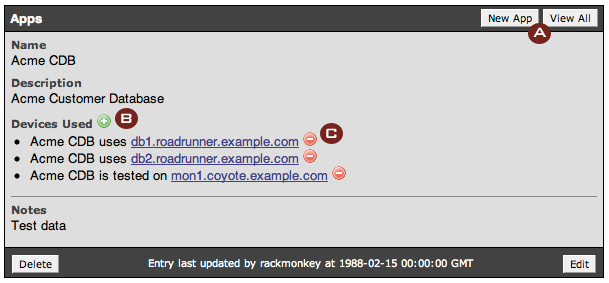
The app table view works in a very similar way to the device table view. When looking at the details of an individual app you will see a screen similar to the one below. You can create a new app or return to the view of all apps with the buttons at the top right of the form (A). To associate an app with a device, click the plus button (B) and complete the simple form. To remove an association choose the minus button (C).
The device view will also show any app associated with a given device: you can just to a device view by clicking on its name (such as db1.roadrunner.example.com in this example).

6. Reports
The Reports tab gives you information on all your devices and racks. For example, you can see the total space available in your racks as well as the customers with the most devices, most common operating systems etc. You can also check for duplicate OS licence keys, serial and asset numbers.
RackMonkey 1.2.5 Documentation Index