RackMonkey 1.2.4 User Guide
RackMonkey 1.2.4 Documentation Index
RackMonkey Version 1.2.4
©2004-2008 Will Green (wgreen at users.sourceforge.net)
Licensed under the GNU Public Licence v2.
Overview
This guide will help you get started with RackMonkey and demonstrate some of its key features. This page includes screenshots: letters in brackets, such as (E), are used to refer to different screenshot areas from within the text. NB. This document is available from within RackMonkey by clicking on the 'Help' tab at the top of the screen.
Tip: Hovering your mouse over many items interface items (such as buttons) provides additional information.
Interface Basics
Navigation
The top of every RackMonkey screen looks similar to the screenshot above. There is a set of tabs (A) that provide access to the key parts of the application, a dropdown to jump to a physical view of a rack (B) and a search box (C) which allows you to find devices by name, serial or asset number. The search is not case-sensitive and will also find partial matches. For example, searching for 'www' will find devices called 'WWW', 'www21' and 'www22'.
RackMonkey Organisation
- Servers, routers, switches etc. are devices and are contained within racks.
- A device has a hardware model and an operating system.
- A device has a domain (such as rackmonkey.org), a role (such as database server), a customer and a service level.
- Apps run on devices.
- Racks are organised in rows which reside in rooms within buildings.
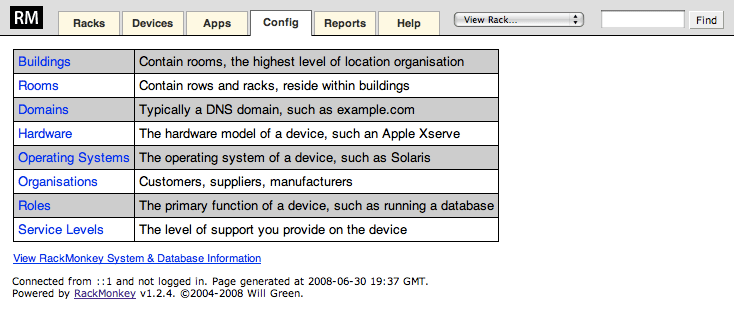
Config
The Config tab contains most of the basic building blocks of RackMonkey data. Here you can configure Buildings, Rooms, Domains, Hardware models, Operating Systems, Organisations (such as customers and manufacturers), Roles and Service Levels. It's a good idea to add your own commonly used items to these categories when you start using RackMonkey. If the sample data was installed with RackMonkey you will have a selection of operating systems and hardware to get you started (see the install documentation for information on sample data).
Working with Devices
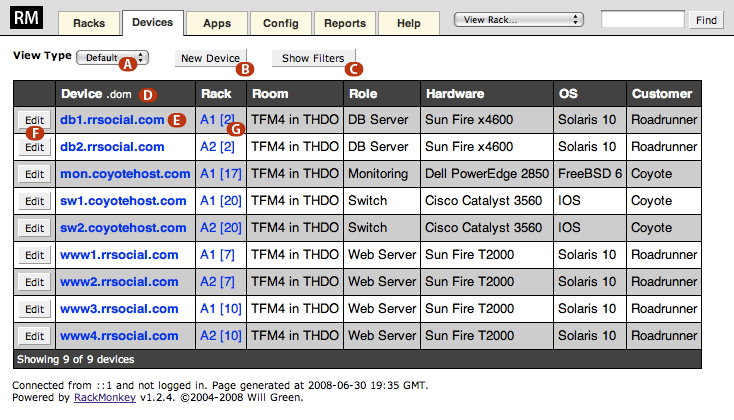
Deciding How to View Devices
The Devices tab (screenshot below) allows you to see all the devices and their configuration. There are several devices views which present different information; you can select an alternate view from the View Type dropdown (A). For example, if you are interested in asset information (such as serial number and age of device), choose the Asset view. To sort the table by a particular column click on its name; for example you could sort devices by Customer rather than the default name (chosen by clicking on the Device column). You can show/hide domain information for devices by clicking the .dom link (D).
The Show Filters button (C) brings up the filter options that allow you to narrow down the devices shown to those of interest; for example you can show all devices for a given customer or all those running Ubuntu. To return to a view of all devices, click the Reset button at the right of the filters or select the Show All link (not pictured) in the table footer.
Working with Individual Devices
To view the full details for an individual device, select its name (E). This brings up a separate screen which also allows you to edit, copy or delete the device. You can also edit a device directly be selecting the edit button next to its name (F). To view a device within its rack, select the link in the rack column (G). The New Device button (B) allows you to create a new device; if populating a whole rack you may find it easier to do this Racks Physical View (discussed below).
Racks
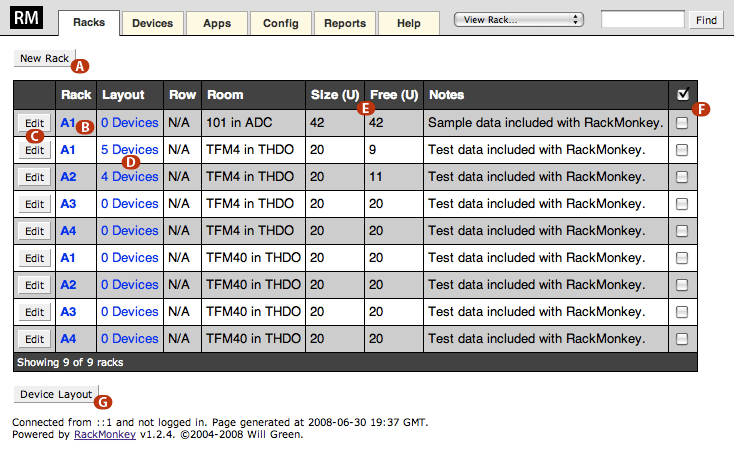
Racks Table
The Racks view (screenshot below) gives you an overview of your racks: which room they reside in and the number of devices they contain. To view the details of a particular rack select its name (B). To view the layout of devices within a rack select the relevant entry in the layout column (D) (See Racks Physical View, below, for details). If you want to see multiple racks side-by-side, select the check boxes next to the racks you wish to view (F) (selecting the check mark in the top column toggles the selected racks) and click the Device Layout button (G). You can sort the racks table by clicking on the headings at the top of the table. For example selecting Free U will sort the racks from least to most free space.
You can see the number of devices within a rack in the Layout column (D). The total and used space in rack units are shown in the Size (U) and Free (U) columns (E). To create a new rack use the button (A), to edit a rack select the Edit button next to its name (C).
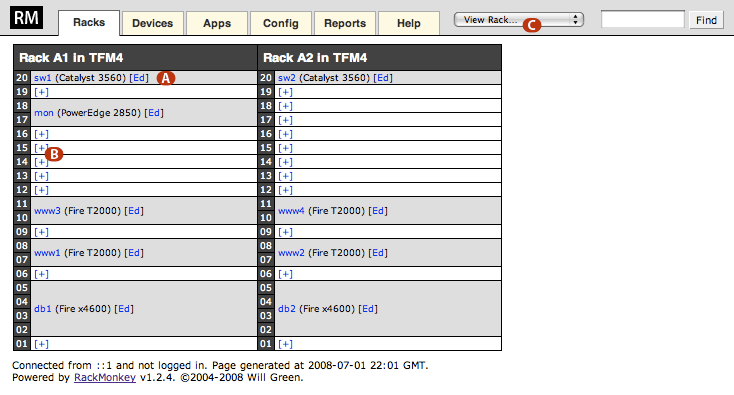
Racks Physical View
In the Physical Rack View (screenshot below) you can see the contents of your racks. You can jump to physical view at any time using the dropdown (C). This view shows the name and hardware type of the device of each device (A) (you can hover over the hardware name to see the manufacturer) together with an [Ed] link which allows you to edit the device. You can add a new device to a rack at a given position by clicking on the + symbol (B). This is a fast way to populate a new rack with devices.
In order to view more than one rack side-by-side you need to select them in the Racks Table (see above).
Reports
The Reports tab gives you information on all your devices and racks. For example, you can see the total space available in your racks as well as the customers with the most devices, most common operating systems etc. The reports view will be expanded upon in future releases.
RackMonkey 1.2.4 Documentation Index